If you are licensed to use the optional document library feature, you can create document libraries for your users. To add a new library:
-
On the DivePort title bar, select ADMIN > Document Libraries.

The Document Libraries
 dialog box opens.
 -
Click New.
The Add Document Library
 dialog box opens.
 -
Enter a Name for the new document library, and then click OK.
The library is added to the Document Libraries list.
-
Click the chevron next to the new document library name, and then select Settings.

The Document Library Settings
 dialog box opens.
 -
Click Add.
The Add Attributes
 dialog box opens. This is where you define the custom attributes for the document library.
 -
Edit the attributes:
- Name: Specifies a name for the metadata column. This attribute is required.
- Description: Specifies the purpose of the column. This description appears as a tooltip on the data entry form.
- Default value: Specifies a default to initialize the column. The value can be explicit or the result of resolving a macro, for example, $(MACRO Threshold). This attribute is optional.
- Display label: Specifies an alternative column heading. This allows you to change what the user sees when prompted for input for this attribute. This attribute is optional.
-
Perform lookup: Enables the Lookup configuration option.
NOTE: Selecting this option disables Must be unique, Required item, and all five Data type options
-
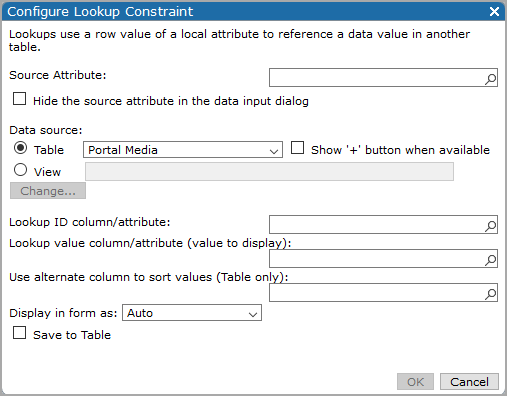
Lookup configuration—Opens the Configure Lookup Constraint
 dialog box, which you can use to define the
  lookup values.
 - Read-only: Select if the column is displayed in the table, but cannot be changed.
- Must be unique: Select if the value must be unique.
- Required item: Indicates if the user must specify this attribute to add a document.
-
Data type: Select one of the five available data types:
-
Text—Specifies that the column accepts any data characters. Click the adjacent Configure option to open the Format text input
 dialog box, which you can use to specify the number of rows of text. Default is 1 row.
 -
Number—Specifies that the column accepts only numeric data characters. Click the adjacent Configure option to open the Configure Attribute Constraint
 dialog box, which you can use to specify the numeric format and a range of acceptable values. For more information, see Formatting Numeric Values.
NOTE: When entering Minimum and Maximum number values, do not include commas. Decimal points are allowed.
-
Date—Specifies that the column accepts a date. Click the adjacent Configure option to open the Configure Date Constraint
 dialog box, which you can use to
  specify the date format and other restrictions.
 -
In a list—Requires that you indicate where the set of values resides. You can enter a short fixed list when you define the constraint, select a library table, or a DiveLine file. Click the adjacent Configure option to open the Configure In A List Constraint
 dialog box, which you can use to
  define the list and other constraints.
-
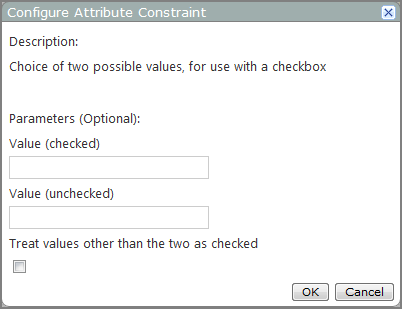
Boolean checkbox—Specifies that two values are available: one displays as a selected check box, and another displays as a cleared check box. Click the adjacent Configure option to open the Configure Attribute Constraint
 dialog box, which you can use to
  specify the Boolean values.
 NOTE: If the column contains more than two values, including empty or null values, DivePort treats the unspecified values as if they are unchecked by default and presents a cleared check box. Alternatively, you can select Treat values other than the two as checked, in which case the check box representing those values is selected.
-
Click OK to save your changes. Add as many attributes as needed to complete the definition of your document library, and then click OK.
See also:
- About Document Libraries
- Table Editor Portlet Options
- Adding a File Collection to a Document Library
- Adding a Document to a Document Library
- Deleting an Entry from a Document Library


 to see a list of available columns. This attribute can be a free entry
column or one with an in a list constraint to match the lookup values.


