The DiveMaster start page contains a window with two panes: Models and Elements. Within each pane, you can specify and configure different functions. This topic provides an overview of each pane.
Models pane
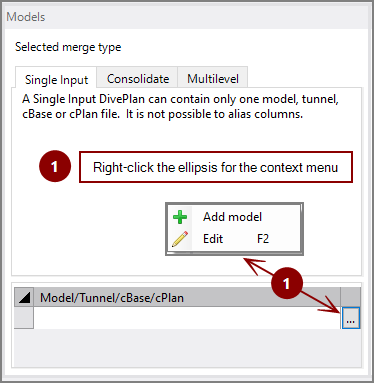
In the Models pane, you can select one of the following types of DivePlans:
- Single Input—A DivePlan that contains only one model, tunnel, cBase, or cPlan file.
- Consolidate—A DivePlan that uses multiple models with similar structures and transaction levels, which can still be accessed separately after they are combined. Consolidate DivePlans generally combine models that span different time periods.
A Consolidate DivePlan can contain model, tunnel, and nested DivePlan files. - Multilevel—A DivePlan that merges multiple models with different structures. Models that are combined in a Multilevel DivePlan must have a common dimension.
A Multilevel DivePlan can contain model, tunnel, and nested DivePlan files.
You can right-click the ellipsis in the ![]() Models section of the start page to add a model, tunnel, cBase, or cPlan from the Open File dialog box for a Single Input DivePlan. For a Consolidate or Multilevel DivePlan, you can add models, tunnels, and nested DivePlans. Alternatively, from the Workbench Explorer, you can drag files directly into the Models pane.
Models section of the start page to add a model, tunnel, cBase, or cPlan from the Open File dialog box for a Single Input DivePlan. For a Consolidate or Multilevel DivePlan, you can add models, tunnels, and nested DivePlans. Alternatively, from the Workbench Explorer, you can drag files directly into the Models pane.
Once you have added a file, you can right-click the ![]() file name to display a context menu with the following options:
file name to display a context menu with the following options:
- Add model—Select another model for the DivePlan.
- Delete—Delete the selected model.
- Refresh—Refresh the model content.
- Edit—Enable editing.
- Alias column names—Open the Column Alias dialog box where you can add or remove column aliases.
NOTE: The options that are available depend on which DivePlan type you select.
Elements pane
After you have added a file to the DivePlan, DiveMaster populates the ![]() Elements pane with columnar information from the model, tunnel, cBase, cPlan, or DivePlan.
Elements pane with columnar information from the model, tunnel, cBase, cPlan, or DivePlan.
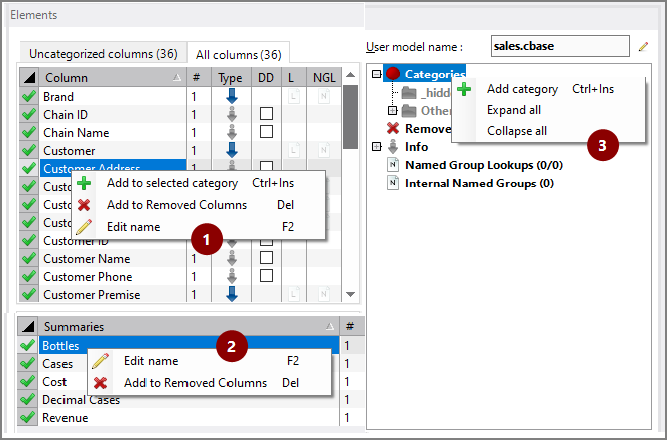
The Elements pane displays columns and summaries for any added files. The Elements pane graphic shows the context menus that are available when you right-click a column or summary name or the Categories heading.
Context menu #1 that displays when you right-click a column name contains the following options:
- Add to selected category—Adds the column name to the category created in the Categories section. Categories are optional folders that you can use to organize model or cBase data in the ProDiver client console.
- Add to removed columns—Moves the selected column to the Removed Columns folder. Removed columns are not loaded when opening the DivePlan in a Diver client.
- Edit name—Changes the label of the selected column name.
Context menu #2 that displays when you right-click a summary name contains the following options:
- Edit name—Changes the label of the selected summary name.
- Add to removed columns—Moves the selected summary to the Removed Columns folder. Removed summaries are not loaded when opening the DivePlan in a Diver client.
Context menu #3 that displays when you right-click the Categories label contains the following options:
- Add category—Creates a new console category to hold columns.
- Expand all—Expands all categories showing their column names.
- Collapse all—Collapses all expanded categories.
The following ![]() Elements pane graphic provides additional descriptive information about a column with options for further column configuration.
Elements pane graphic provides additional descriptive information about a column with options for further column configuration.
Context menu #1 that displays when you right-click the Dynamic Dimensions (DD) column of a dimension contains the following options:
- Add to selected category—Adds the column name to a selected category folder.
- Add to removed columns—Adds the column to the Removed Columns folder.
- Edit lookup file—Opens the Lookup File dialog box where you can modify a lookup file.
- Edit named group lookup file—Opens the Named Group Lookup File dialog box where you can modify a named group lookup file.
- Set all Info Fields as Dynamic Dimensions—Promotes all Info Fields to Dynamic Dimensions. You can promote individual Info Fields to Dynamic Dimensions by selecting the check box in the “DD” column.
- Unset all Info Fields as Dynamic Dimensions—Demotes all Dynamic Dimensions to Info Fields. You can demote individual Dynamic Dimensions to Info Fields by selecting the check box in the “DD” column.
As illustrated in the following graphic, ![]() headings in the Elements pane provide information about a column and enable you to view information and perform the different actions as numbered.
headings in the Elements pane provide information about a column and enable you to view information and perform the different actions as numbered.
- Uncategorized columns—Provides a count and lists the names of all columns that have not been placed in a console category.
- All columns—Provides a count and lists the names of all columns contained in the DivePlan. A DivePlan can contain multiple models with duplicate columns.
- Column—Displays an alphabetical listing of the column names.
- #—Lists the number of models that contain the column.
- Type—Identifies the column as a dimension with a blue arrow or as an Info Field with a gray arrow.
- DD—Identifies the Info Field as a Dynamic Dimension when selected.
- L—Adds a lookup. Click in the “L” column to open the Lookup File dialog box where you can add a lookup file to a core dimension.
- NGL—Adds a named group lookup. Click in “NGL” column to open the Named Group Lookup File dialog box where you can add a named group lookup file to a core dimension.
NOTE: The Categories section displays any lnfo Fields and lookup files that are stored in the DivePlan. Also, the _hidden category folder contains columns that do not appear in the ProDiver client console. The “Other Dimensions” folder contains columns that are not categorized but are stored in the DivePlan. Columns moved to the “Removed Columns” folder are not loaded when opening the DivePlan in the ProDiver client.
See also:


