You can create your own custom Production Extensions to help simplify your work in Production by sharing and reusing chucks of code.
First create and test a script to use as the basis for the extension. You can use Workbench to develop and test a Production script (prd), an Integrator script (int), or a DIAL script (dial). Use the tools of your choice to write and test Java scripts (jar) or PHP scripts (php). The script should be as generic as possible using parameters for the settings.
To create a Production Extension for the tested source script:
-
Select Tools > Extension Editor to open the Extension Editor.
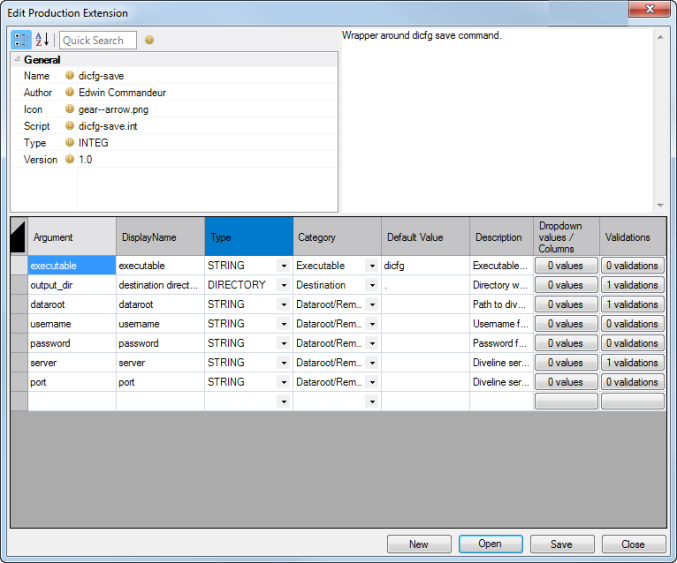
The Edit Production Extension dialog box appears.
- Enter the following information in the General attributes pane:
- Name
- Author
- Icon—Specify a 16x16 png file. To select the file, use the browse button that appears when you click in the Icon box.
- Script—Specify the path to the Script that this extension is based on. To locate the script, use the browse button that appears when you click in the Script box.
- Type—Select the script type from the Type pull-down list.
- Version—Edit the Version number, if appropriate.
- Description—In the Description box, enter the required description for the extension. The description is used as a tool tip.
If the source script uses global parameters, they are listed automatically in the table.
-
Add any additional parameters or edit existing ones. See more details under About Parameters in the following section.
-
Click Save.
-
Navigate to where you want to store the file in the Save As dialog box.
-
Type a name for the extension and click Save.
The extension is saved to your local drive and can be installed on the DiveLine server using Workbench. The saved extension has a filetype of pre. The contents can be viewed with an archive viewer. The key components are the config.xml file and the executable script.
![]() Example Edit Production Extension dialog box
Example Edit Production Extension dialog box
Considerations for parameters (Arguments) in the Edit Production Extension dialog box:
-
Change the parameter name presented to the user by using the DisplayName column.
-
Set the parameter type in the Type column. Workbench automatically alerts you if the filled-in value does not match the parameter type:
- STRING is the default type.
- INTEGER ensures the parameter is a whole number.
- BOOLEAN changes the parameter to a true/false check box.
- FILENAME allows browsing to a specific file.
- DIRECTORY allows browsing to a specific folder.
- LIST allows setting further parameter options under Dropdown values.
- NOTE: The FILENAME and DIRECTORY types refer to paths that are translated to local file system paths when run. In order to keep paths as Project paths, use the STRING type.
-
Group parameters by type in the Category column. These categories become section headers in the node's attribute pane.
-
Supply a default by using the Default Value column.
-
Enter a Description for the script argument. The descriptions appear as tool tips in the node's attribute pane.
-
Restrict acceptable values by setting them in the Dropdown values/Columns column. Click to access the Edit values dialog box.
-
Set the validation rules for required parameters in the Validations column. Click to access the Edit Validation Rules dialog box.
You can use the Extension Editor to later edit the parameters by selecting Tools > Extension Editor and selecting Open to open the script. The dialog box populates the attributes and parameters of the script.
See also:
Mentioned in:
