Lock Process Node
A Lock node prevents scripts from running simultaneously by "locking" them. When a Lock node is run, it places a lock with the specified name. If that lock already exists, then the script will wait in a queue for its turn. If there is no lock yet, then it will put the lock in place and continue with the rest of the script. When the script finishes, it will remove its lock and automatically start the next script in the queue if there is one. For information about unlocking a lock, see Unlock Process Node.
![]()
The Lock node has ![]() two panes where you set attributes.
two panes where you set attributes.

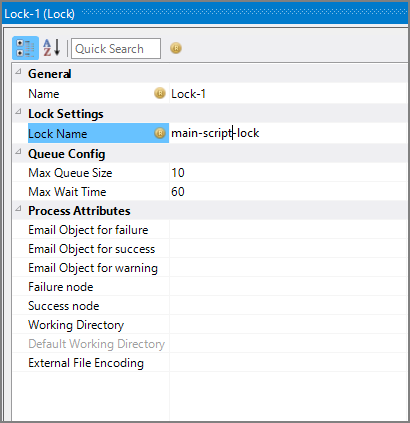
You set attributes for the Lock node in the ![]() node attributes pane.
node attributes pane.
| Attribute | Description |
|---|---|
| Name | Specify a descriptive name for the node. Lower case names maximize usage of the available space. |
| Lock Name | A unique name for the lock. The lock name is persistent across a DiveLine, so multiple scripts from different projects can queue for the same lock. |
| Max Queue Size | The max number of scripts a lock queue can contain. When multiple scripts run using the same lock, scripts are queued for that lock. If the queue size is equal to this specified length, the lock fails instead of being queued. This helps detect queues that are too full, and prevents scripts from piling on. |
| Max Wait Time | The max number of seconds a script can wait in the queue before being removed and failing. This prevents scripts getting stuck while they’re already in the queue. |
| Email Object for failure |
Select a predefined mailing list to send an email to if the node fails. The pull-down list is populated with items that can be found in Project Settings > Mailing Lists > Email Templates. |
| Email Object for success |
Select a predefined mailing list to send an email to if the node succeeds. The pull-down list is populated with items that can be found in Project Settings > Mailing Lists > Email Templates. |
| Email Object for warning |
Select a predefined mailing list to send an email to if the node generates a warning. The pull-down list is populated with items that can be found in Project Settings > Mailing Lists > Email Templates. |
| Failure node | Select the next node upon failure. The pull-down list contains all nodes that are on the Task Flow. |
| Success node | Select the next node upon successful completion. The next node automatically populates if a connecting line is set on the Task Flow. The pull-down list contains all nodes that are on the Task Flow. |
| Working Directory |
Specifies the directory in which this node runs. If left blank, the Default Working Directory attribute that is set in the Start Control Node is used. When running a script, Production sets the working directory for the child process to the directory that contains the script, unless the node specifies a different directory. See Start Control Node. |
| Default Working Directory |
Displays the Default Working Directory that is set the the Start Control Node. If a Default Working Directory is not specified, this attribute is blank. Applies to all nodes. See Start Control Node. |
| External File Encoding |
Select the format for the node input files. If this attribute is blank, Workbench attempts to detect the type of encoding. This attribute is also used when saving log files. The encoding might need to be adjusted when using data with high bit Latin-1 characters or Unicode characters. |
Each node has an area where you can enter comments.
It is a DI best practice to enter a note for every node in a Production script. These notes can help you or a coworker understand the intent of the node and troubleshoot issues in the future.

For more information, see Using Lock and Unlock Nodes.