The Visual Integrator (VI) XML input object extracts tabular data from XML (eXtensible Markup Language) documents into the script.
![]()
XML is defined by the World Wide Web Consortium (W3C) through recommendation at https://www.w3.org/TR/xml/.
An XML document describes a tree of elements and attributes. The XML input object extracts data from the tree in the form of rows and columns. The XPath query language identifies the set of nodes to become rows, and XPath expressions identify the column values relative to these nodes. XPath is also defined through W3C at http://www.w3.org/TR/xpath20.
Although XPath is a powerful expression language, the simplest of expressions allow you to extract most data from an XML document. For some examples of XPath expressions and generated output, see XPath Examples.
The XML input object reads the entire XML file into memory to search and access the nodes quickly. When processing large XML input files, you might want to stage them into tab-delimited files before continuing with other processing.
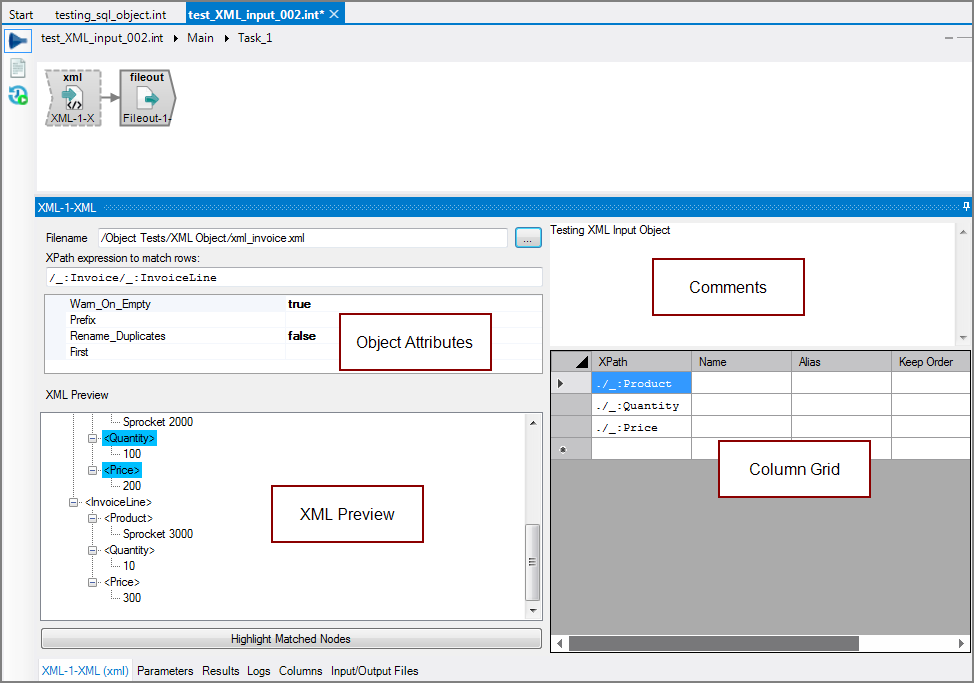
The XML input object has ![]() four panes where you set attributes.
four panes where you set attributes.
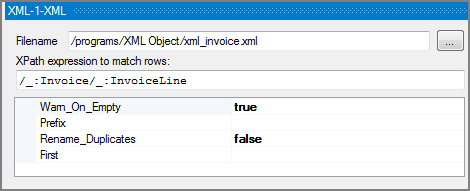
You set attributes for the XML input object in the ![]() object attributes pane.
object attributes pane.
| Attribute | Description |
|---|---|
| Filename | Defines the XML input file. Use the browse button to navigate to the file, or type the path and file name. |
| XPath expression to match rows |
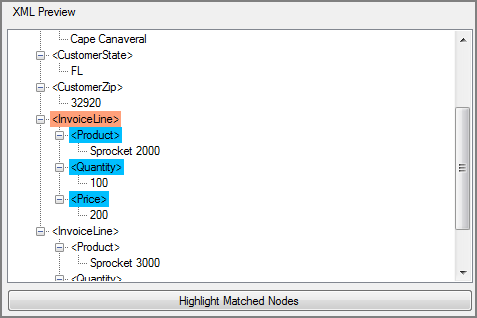
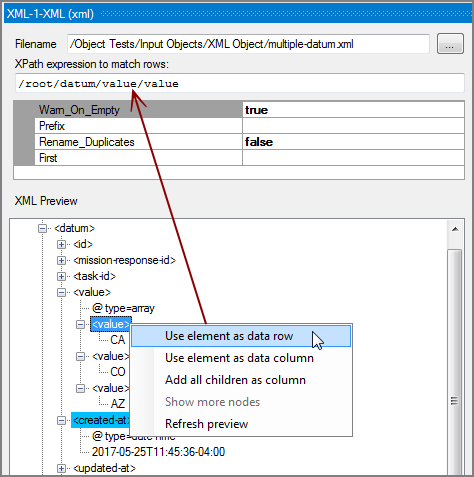
Defines the XPath expression. Nodes that match the expression are returned as rows of input and are highlighted in the XML Preview section. Each matching node results in a row returned. NOTE: You can right-click a node in the XML Preview section and choose Use element as data row to populate the expression. Column values are defined in the Column Grid. See XPath Examples for samples of XPath expressions. If the XML document uses a default namespace, you cannot refer to elements using just a simple reference because a prefix is required. For more information, see Namespaces. |
| Warn_On_Empty |
Specifies whether or not to display a warning when the XPath expression does not match any nodes:
|
| Prefix | Defines a prefix that is added to all column names in the flow. If you want a space between the prefix and the column name, include that space in the prefix string definition. Any columns assigned an alias do not use the prefix; instead, the columns use the alias name. |
| Rename_Duplicates |
Renames duplicate columns so that each column in the output data flow has a unique name. The duplicate naming process occurs before attributes defining aliases, prefixes, or the columns to keep are applied, so these generated column names can be aliases to another name.
|
| First |
Specifies a number to limit how many records are read from each input file. This attribute is useful for script testing on a small number of records. If not used, all rows are read. |
The ![]() XML Preview section loads and displays the entire XML document.
XML Preview section loads and displays the entire XML document.
NOTE: When previewing very large XML files, Workbench examines the first 10 MB and shows a partial XML tree.
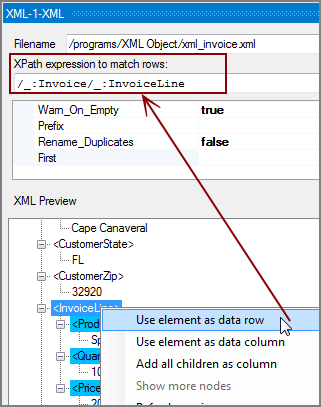
In the XML Preview section, you can ![]() right-click a node to make the element a data row or data column in the data flow.
right-click a node to make the element a data row or data column in the data flow.
By using these context commands, you can set the rows and column values that enter into the data flow:
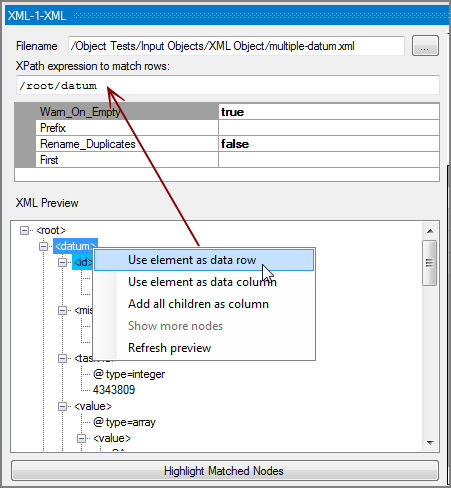
- Use element as data row—Enters the element as the XPath expression to match rows attribute.
 For example:
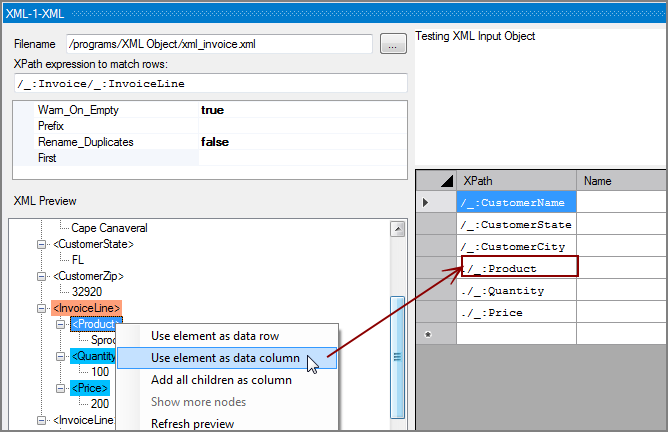
 - Use element as data column—Places the element in the column grid as a column.
 For example:
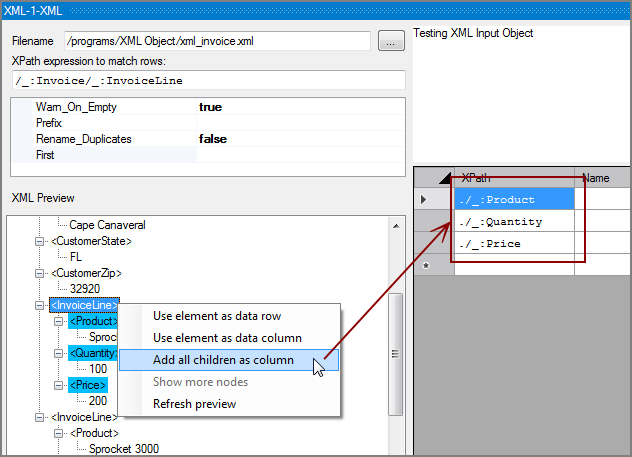
 - Add all children as column—Adds all children elements to the column table in the column grid.
 For example:
 - Show more nodes—For large XML files, displays more nodes.
- Refresh preview—Refreshes the XML Preview when the XML file changes.
Each object has an area where you can enter comments.
It is a DI best practice to enter a note for every object in a VI script. You can set a VI preference to give a warning for each object without a note.
The ![]() XML input column grid displays the columns from the input files.
XML input column grid displays the columns from the input files.
| Attribute | Description |
|---|---|
| XPath | Displays the input columns that generate for the output flow. These columns are populated by typing directly in the field or with the context commands (Use element as data column and Add all children as column) as previously described. |
| Name |
Optionally, specifies a column name if there are duplicate element names in the schema or complex XPath expressions. VI normally generates column names from the XPath expression, and column names are taken from the XPath column. |
| Alias |
Defines alternate names for any of the input columns. Spaces before or after an alias column name are ignored. Spaces within an alias column name are acceptable. |
| Keep Order |
Manages the order that columns display in the output data flow. By default, columns that are passed to the next object in the data flow are displayed in the order that they appear in the Name column. You can change this order by typing a number in the Keep Order column. When you assign a Keep Order number, the Keep column is checked automatically. The Keep Order numbers might reorder to accommodate any changes you make. |
| Keep |
Manages which columns are kept in the output data flow. If no columns have a Keep check mark, all columns are kept in the output data flow, except for any explicitly marked Remove. Select the Keep check box for columns you want to explicitly keep in the output data flow. A number is automatically added in the Keep Order column when you select its Keep check box. After marking any column with a Keep check mark, only those marked Keep are kept in the output data flow. NOTE: After any Keep check boxes are checked, do not use the Remove check boxes as clicking a Remove check box sets all Keep check boxes to unchecked. |
| Remove |
Manages which columns are removed from the output data flow. Select the Remove check box for columns that you want to explicitly suppress from the output data flow. NOTE: Use the Remove check boxes only when no Keep check boxes are checked. |
One aspect of XML that might affect the operation of the XML input objects and the use of XPath is XML namespaces. If the document you are reading defines a default namespace with the xmlns attribute, you need to take that into account when writing your XPath expressions. XML uses namespaces to identify elements uniquely across different object definitions.
XML elements might define namespaces using the xmlns attribute by using one of the following formats:
<root xmlns:h="http://www.w3.org/TR/html4/">
<root xmlns="http://www.w3.org/TR/html4/">
In the first format, the namespace "http://www.w3.org/TR/html4/" is defined with the prefix "h". In the second format, the namespace "http://www.w3.org/TR/html4/" is defined as the default namespace.
If a document does not have a default namespace, any element without a prefix is considered to have no namespace. XPath can refer to these elements using a simple reference. For example, XPath can refer to the <Employee> element, which does not have a prefix, with the simple reference "//Employee".
If the document you are reading defines a default namespace, you cannot refer to elements using just a simple reference, such as /Company, /Employee. The elements must have a prefix in an XPath expression to identify them as part of that namespace, even though the original namespace does not have a prefix.
To accommodate this situation, the XML input object checks the root node of the document to see if it defines a default namespace. If it does, it will define a prefix "_" for XPath that refers to this namespace for use in XPath names. In this situation, element names should be preceded by "_:" in the XPath expressions. For example:
match = "//_:Employee"
and
columns = {"./_:Last_name",
"../_:Department_Name"
}
This should be sufficient to return the proper data.
XPath is a powerful expression language that you can use to select data from your XML files. The following examples show the power of XPath with simple expressions as used within the XML input object.
For more information about XPath, see http://www.w3.org/TR/xpath20.
This example shows how to produce an output row for each datum element in an XML file that has multiple datum elements.
-
In the XML preview, right-click the element that you want to use as the row element, and click Use element as data row. This populates the XPath expression to match rows field.
 For example, use the context commands to add the XPath expression for the datum element:
In this example, all elements under datum are selected.
-
In the XML preview, right-click each element under the selected row that you want to include as a column in the XPath expression, and click Use element as data column.
 For example:
The ./ indicates that the expression is relative to the row selected in the XPath field in the column grid. In this example, id, created-at, and context are the columns added to the XPath expression.
-
Save the tab.
-
Run or test the XML input object to see that it produces a row for each element found under the selected row (datum in this example) and then finds the values for each element in the XPath expression as described in the column grid (id, at, and context in this example).
 Output example:
There are two rows because there are two datum elements selected from the XML file.
This example shows how to produce an output containing a row for each of the value elements within a single datum element from the XML file.
-
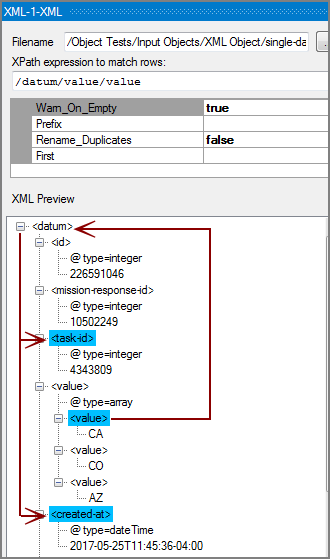
In the XML preview, right-click the element that you want to use as the row element, and click Use element as data row. This places the second-level value in the
 XPath expression to match rows field, which in this example is datum/value/value.
 -
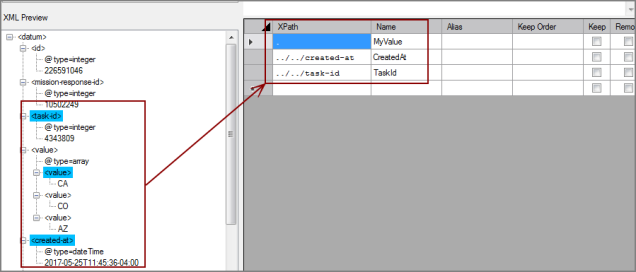
Then, type the following three rows in the
 column grid. (There is no context command for entering these columns at this level.)
XPath Name . MyName ../../created-at CreatedAt ../../task-id TaskID The single dot (.) indicates to take the value of the current element, which is value in this example.
The double-dot-slash (../../) takes you up
 two nodes from the initial row (datum/value/value in this example) and takes the value of the indicated columns (created-at and task-id respectively in this example).
 -
Save the tab.
-
Run or test the XML input object to see that it produces a row for each value (CA, CO, and AZ in this example) as described in the column grid.
 Output example:
There are three rows returned, each with the three values as indicated in the columns section of the XPath expression in the column grid.
This example shows how to produce an output containing a row for each of the value elements within multiple datum elements from the XML file.
-
In the XML preview, right-click the element that you want to use as the row element, and click Use element as data row. This places the second-level value in the
 XPath expression to match rows field, which in this example is /root/datum/value/value.
 -
Then type the following in the
 column grid. (There is no context command for entering these columns at this level.)
XPath Name . MyValue ../../created-at CreatedAt The single dot (.) indicates to take the value of the current element, which is value in this example.
The double-dot-slash (../../) takes you up two nodes from the initial row (datum/value/value in this example) and takes the value of the indicated columns (created-at in this example).
-
Save the tab.
-
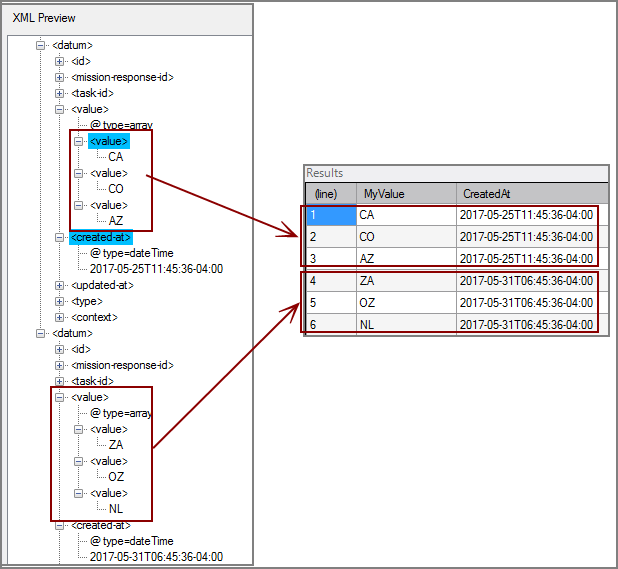
Run or test the XML input object to see that it produces a row for each of the values for the two value sections (CA, CO, AZ and ZA, OZ, NL) as described in the column grid.
 Output example:
There are six rows returned, each with the two values as indicated in the columns section of the XPath expression in the column grid.
Mentioned in:
