The Visual Integrator (VI) Tunnel output object enables the creation of a specialized VI script as a Tunnel script, which creates a dynamic memory model. The Tunnel script allows the DiveLine server to access data from external data sources and retrieve real time data.
![]()
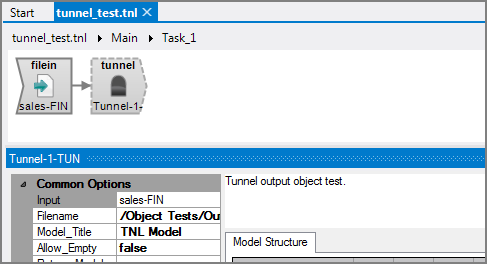
You create a Tunnel script by including a Tunnel output object and saving the VI script with the tnl extension.
The Tunnel script can access data contained in flat files, spreadsheets, models, or SQL and Access databases. In the Tunnel script, you can process input data with any of the VI process objects. When DiveLine runs a Tunnel script, it reads the data returned by the Tunnel output object, and then constructs and opens a dynamic memory model. A Tunnel file can be used in the same manner as a model file in DivePlans and markers.
When run in VI, the Tunnel output object writes data to a file. However, when DI clients access the script, the Tunnel output object is used as the data source. Any DiveLine client can view the data from a Tunnel object.
NOTE: Tunnels are useful when dealing with classic models. However, Spectre Builds can also access real time data using ODBC input when creating cBases.
When DiveLine runs a Tunnel file, certain DiveLine values are passed as parameters to the Tunnel script. To use these parameters, they must be declared in the Parameters sub-tab at the bottom of the Tunnel script window. These parameters all start with an underscore (_) to distinguish them from parameters that can be passed from the report palette or a DivePort click action.
| Parameter | Description |
|---|---|
| $_user | The name of the DiveLine user running the Tunnel script. This parameter filters data that is processed in the Tunnel script and only user data is returned. |
| $_pid | The process ID (PID) of the DiveLine process running the Tunnel script. This parameter can be used to create and identify unique temporary areas for the Tunnel script to work in. |
| $_diveline | The DiveLine dataroot directory name for the DiveLine process running the Tunnel script. |
| $_diveline_data |
The directory name for the data area for the DiveLine process running the Tunnel script. For example: \di\solution\dl-dataroot\data This directory is the server path that appears as the root directory in DiveLine clients. |
| $_hash | This contains all parameter values available for use by the Tunnel script. It can be used to determine if anything has changed, allowing you to bypass re-running logic that would produce the same results. |
TIP: Tunnel parameter names are case sensitive.
When opening a Tunnel file, DiveLine runs the given script, reads the data returned by the Tunnel output object, and constructs a dynamic memory model that then opens. A Tunnel file can be used in the same way as a mdl file can be used, that is, in DivePlans and in markers. It can be used in a report palette cell link or a report window item link. These links employ the standard diveref: syntax:
diveref:window_type["tunnel_file.tnl"
	{parm="$TEXT"}.dive_dimension,
	_attribute_name="attribute_value"]
For more information about window dive reference strings, see
For Model calculation references, the general syntax is:
Summary Type[ "tunnel_file.tnl"
	{ parameter1="valuea",
	  parameter2="valueb"}.Summary field,
	  dimension1="valuec", dimension2="valued" ]
where Summary Type is "Total", "Minimum", "Maximum", etc. For more information about
calculation references, see
Numerous DivePort portlets can use a Tunnel script as a data source. This includes Measures, Marker, and Indicator portlets. In addition, when tables are defined in DivePort, attributes can be specified so values are constrained by a list. Such a list can be sourced from a fixed list (hard coded), from a table (document library or input table), or from a view ( mdl, dvp, tnl ). Table settings can also include extra form validation, which allows for passing a completed form into a validation Tunnel script. Customized, real-time data validation and responses to submitted forms are possible.
NOTE: When DivePort uses a Tunnel script, it makes all QuickView and QuickView values available to the script. However, this does not include Model QuickViews. Only External QuickViews are passed to Tunnel scripts.
A DivePort implementation can also include event-driven server scripts that use Tunnel scripts to ensure the freshness of data presented in the portal. For more information on using Tunnels with DivePort, see
Although all DiveLine clients support Tunnel scripts, user configurations must be set in DI-Config to allow Tunnel file execution in the 6.4 DiveLine namespace. Also, in terms of data security, DiveLine ACLs for tnl files are similar to mdl files. Access is granted or denied on the memory model, not on the source data. If the source data is a model, ACLs were applied when the memory model was built.
For 7.x projects, if access control rules are defined such that the user has read permission to see and open a Tunnel script, the script can run. There are no additional access control checks on files that Tunnel scripts open from a project. Tunnel scripts can only be created by authorized users, and these scripts are considered trusted. This matches non-project behavior.
You should use DI Production whenever you have a Build task. Production creates files that are used semi-permanently (at least for the rest of the day). While it is optimized for batch processing overnight, it is also capable of building models over the course of the day for various caching reasons. Use Production when you want to keep the results available for longer than the session.
Use the Tunnel functionality whenever you have an ephemeral need for data that you cannot extract from a model because of performance concerns or because the data needs to be retrieved in real time. Tunnel scripts should not leave files behind—or at least not ones that need to be consumed by other processes. In the end, the Tunnel script should output only a memory model. Use Tunnel when you do not need the results after the user is done with them.
A best practice is to use Tunnel functionality when you have a single Integrator script to build a model. Use Production when you have a series of Integrator scripts that need to be run.
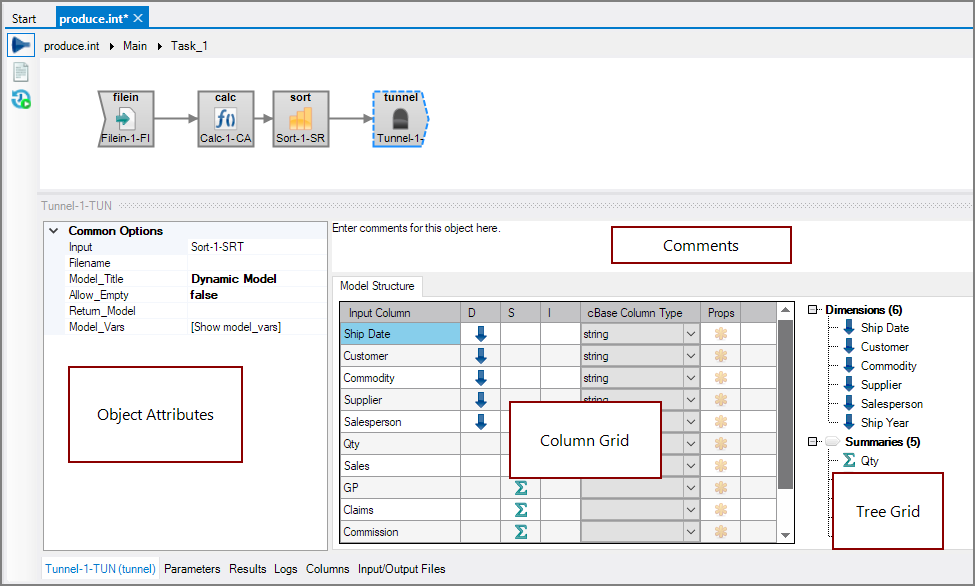
The Tunnel output object has ![]() four panes where you set attributes.
four panes where you set attributes.
You set attributes for the Tunnel output object in the object attribute pane
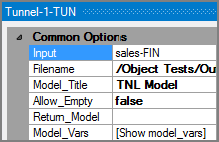
| Attribute | Description |
|---|---|
| Input |
Defines the object from which the data flow arrives. Use one of the following methods to attach the Tunnel object to an input data flow object:
|
| Filename |
Defines the name and path for a text output file that is used for developing and debugging the script. This output file is written with column headings and commas as the delimiter. Enter a path and file name in the Filename box, or use the browse button to navigate to the file. NOTE: When a DiveLine client accesses the Tunnel script, this output file is ignored. |
| Model_Title | Defines the name for the resulting dynamic memory model created from the Tunnel script. Enter your title in the Model_Title box. The default is set to Dynamic Model. When the Tunnel script is opened in ProDiver, this name appears in the console. |
| Allow_Empty |
Defines how to handle scripts that return no records due to the parameters that are used to filter the data.
NOTE: Empty models might be needed for dynamic memory models or file versions when the Return_Model attribute is specified. |
| Return_Model |
Defines the model to open as a result of running the Tunnel script. When set, the Tunnel returns the model indicated and does not return raw data. Enter a path and file name for the existing model in the Return_Model box, or use the browse button to navigate to the file. This attribute is useful when an earlier task in the script builds the model and you want to access that data. When you use this attribute, place the Tunnel output object in a task by itself because the Input attribute is ignored. |
| Model_Vars |
Specifies the user-defined model variables for the model. Click the browse button to open the Variables use the following form: <variable_name>=<variable_value> These model variables are available in ProDiver through the $MODELVAR reporter variable. |
Each object has an area where you can enter comments.
It is a DI best practice to enter a note for every object in a VI script. You can set a VI preference to give a warning for each object without a note.
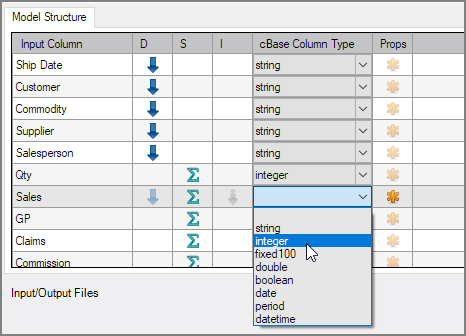
You set attributes for the Tunnel output dynamic memory model in the ![]() Model Structure column grid.
Model Structure column grid.
For each input column you can indicate the following column properties.
| Attribute | Description |
|---|---|
| Input Column | Displays the name of each input column. This attribute is read-only. |
| D (Dimension) | Defines the input column to be a dimension in the model output. At least one input column must be defined as a dimension. To define a column as a dimension, click the D column for that row. |
| S (Summary) | Defines the input column to be a summary column in the model output. To define a column as a summary column, click the S column for that row. |
| I (Info Field) | Defines the input column to be an info column to a corresponding dimension in the model output. To define a column as an Info Field, click the I column for that row. |
| cBase Column Type |
Sets the data types for each input column.
For more information, see Column Properties Dialog Box and Spectre Data Types. TIP: These "Spectre capabilities" only apply when the tunnel script is used in a tunnel-input in a cPlan. |
| Props (Column Properties) |
Opens a separate Column Properties dialog box where you can set detailed properties. For more information, see Column Properties Dialog Box. |
The ![]() Column Properties dialog box allows you to set detailed properties for dimension, summary, and info field columns prior to building the dynamic memory model. Irrelevant properties are grayed out.
Column Properties dialog box allows you to set detailed properties for dimension, summary, and info field columns prior to building the dynamic memory model. Irrelevant properties are grayed out.
It is important to identify date columns so that they are stored properly in the model, facilitating ProDiver functions such as sorting, date and time functions, and time series.
| Attribute | Description |
|---|---|
| Name | Displays the name of the input column |
| Column is a string | Columns with numeric data are considered numeric columns and any leading zeros are stripped off. Select this check box for columns that contain numeric data that should not have any calculations made on it, such as zip codes or part numbers. This attribute preserves leading zeros in the data and allows use of string manipulation functions. |
| Format |
If the column is a date string, select a format from the pulldown. Choices include:
|
| Column is a date |
Select this check box to treat the column as a date. This attribute is equivalent to clicking the Date column for an input column in the Model Structure. If selected in the Model Structure, the Column is a date check box is selected and the same in reverse. When creating a model, Builder converts date columns into an internal date format (an integer number). This number represents the count of days since December 31, 1899. This internal format lets ProDiver easily manipulate dates for use in time series, period comparisons, calendar plots, and dimension date roll-up features. This allows ProDiver to sort dates chronologically, by year as well as month and day. For example, 12/10/2011 would come before 10/10/2012, but after 01/01/2011. |
| Period calendar |
Select the calendar fora period column. Valid calendars are the ones described in the Spectre topics (Date and Time Functions, Time-Series Functions, Creating a Custom Calendar): gregorian month, gregorian quarter, iso8601 week, gregorian+<N> month or a custom calendar file. TIP: These "Spectre capabilities" only apply when the tunnel script is used in a tunnel-input in a cPlan. |
| Column contains nullable data | For columns marked as summaries, select this attribute so that Builder distinguishes between zeros and nulls and keeps a count of the non-null values in the input. Normally, Builder treats null values in input as zeros. This count is used when calculating averages and standard deviations on the field in ProDiver. Setting this attribute slightly increases the size of the resulting model. |
| Sort by |
For columns marked as dimensions, allows you to set up an alternative sort. By default, ProDiver sorts low to high in the following order:
This alternate sort is an internal sort within the model of one column following the default sort of another column. An example of an alternate sort is to sort the dimension parts by part number rather than alphabetically. Select the desired column from the list to change the sort order for the dimension. |
Use the Tree Grid to manipulate the output that displays in the ProDiver console.

The tree builds as you make selections in the Model Structure section, and the dimension order in the tree is what appears in the ProDiver console.
In the Tree view you can:
-
Double-click an item to open that column's Column Properties dialog box.
-
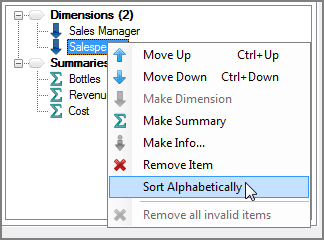
Use the
 context menu commands to reorder items or change properties of the tree grid.
Mentioned in:
