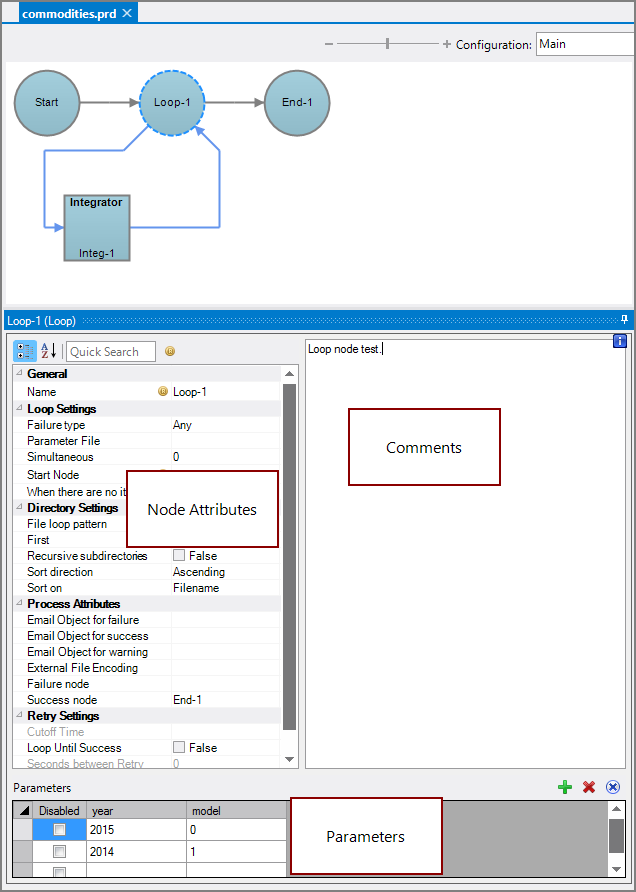
A Loop node is a Production control node that processes a set of nodes multiple times before continuing along the branch.
![]()
The number of times the flow loops through these nodes depends on the number of iterations that are defined. With each iteration, the nodes in the loop are processed with different values based on defined parameters or a file-matching pattern.
NOTE: If testing part of a Loop node, you can control which iterations of the loop run by using different run configurations.
Each Loop node might have a corresponding Integ node, which generates the parameter file to be used by that Loop node. The script should run immediately preceding the loop or parameter file that is using it. A Loop node is equivalent to an Integrator Iterate output object; therefore, it must contain or reference a set of parameters within the Loop node.
NOTE: The Loop node has an overall failure or success mechanism, but not per iteration. The Loop attempts all of the iterations, even if some fail.
The Loop node has ![]() three panes where you set attributes.
three panes where you set attributes.
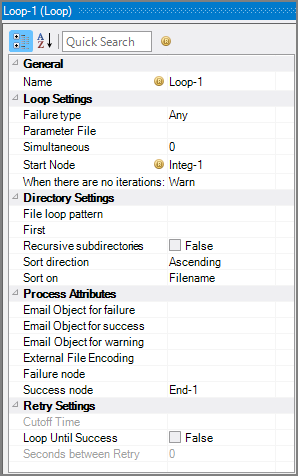
You set attributes for the Loop node in the ![]() node attributes pane.
node attributes pane.
| Attribute | Description |
|---|---|
| Name |
Specify a descriptive name for the node. Lower case names maximize usage of the available space. |
| Failure type | Specify how to handle a Loop node failure:
|
| Parameter File (Required if no File loop pattern or Parameters attribute is set) |
Specify a tab-delimited text file that contains the parameters. To select the file, use the browse button (...) that appears when you click in the empty Parameter File box. The first row of the file should contain the names of the parameters to use. Each subsequent row should correspond to a single iteration through the loop with one or more parameter values (one per column). NOTE: When using a Parameter File, the parameters display in the Parameter Preview pane, which provides the context commands Enable All and Disable All. This attribute and the Parameters and File loop pattern attributes are mutually exclusive. Use one of these three attributes to define the loop. |
| Simultaneous |
Define the maximum number of loop iterations to process at the same time:
|
| Start Node (Required) |
Defines the first node within the loop to begin the iterations. This attribute populates automatically if the first node is on the Task Flow panel. |
| When there are no iterations |
Select how to handle if no loop iterations occur: Warn, Fail, or Succeed. The default is Warn. |
| File loop pattern (Required if no Parameter File or Parameters attribute is set) |
Set specific files to include in loop iterations using a match pattern. To select the files, use the browse button (...) that appears when you click in the empty File loop pattern box. Use wildcard characters to indicate a series of files to use for the loop pattern. Use the Insert Parameter context menu to access parameters generated automatically when a loop pattern is used. This attribute and the Parameter File and Parameters attributes are mutually exclusive. Use one of these three attributes to define the loop. |
| First |
Define the number of records to process. Enter a number that sets the maximum number of records to process. NOTE: A script-level Production parameter is acceptable here, which might aid in testing. |
| Recursive subdirectories |
Set to True to include files in subdirectories that match the wildcard string. The default is False. This attribute is used in conjunction with the File loop pattern attribute. |
| Sort direction |
Select the sort direction. The default is Ascending. This attribute is used in conjunction with the File loop pattern attribute. |
| Sort on |
Select what to sort on: Filename, Path, Size, or DateModified. The default is Filename. This attribute is used in conjunction with the File loop pattern and Sort direction attributes. |
| Email Object for failure |
Select a predefined mailing list to send an email to if the node fails. The pull-down list is populated with items that can be found in Project Settings > Mailing Lists > Email Templates. |
| Email Object for success |
Select a predefined mailing list to send an email to if the node succeeds. The pull-down list is populated with items that can be found in Project Settings > Mailing Lists > Email Templates. |
| Email Object for warning |
Select a predefined mailing list to send an email to if the node generates a warning. The pull-down list is populated with items that can be found in Project Settings > Mailing Lists > Email Templates. |
| External File Encoding |
Select the file encoding for input files coming into the node. If left blank, Workbench attempts to auto-detect the encoding. |
| Failure node |
Select the next node upon failure. The pull-down list contains all nodes that are on the Task Flow. |
| Success node |
Select the next node upon successful completion. The next node automatically populates if a connecting line is set on the Task Flow. The pull-down list contains all nodes that are on the Task Flow. |
| Cutoff Time |
Set the cutoff time in HH:MM:SS format. The Cutoff Time is the time after which no future iterations should be queued. This attribute is only available if the Loop Until Success attribute is set to True. |
| Loop Until Success |
Set to True to specify that the loop iterates until the result is success or the defined Cutoff Time is reached. The default is False. This attribute is used in conjunction with the Seconds between Retry attribute to specify the amount of time to allow between retries. |
| Seconds between Retry |
Set the number of seconds to wait before retrying failed iterations. This attribute is only available if the Loop Until Success attribute is set to True. |
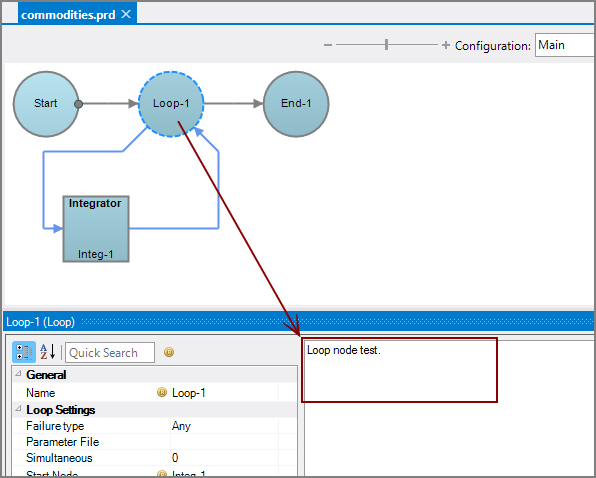
Each node has an area where you can enter comments.
It is a DI best practice to enter a note for every node in a Production script. These notes can help you or a coworker understand the intent of the node and troubleshoot issues in the future.
Individually define parameters for the loop in the ![]() Parameters pane.
Parameters pane.
This attribute is required if no Parameter File or File loop pattern attribute is set.
Set parameters with the following:
- Add Column—Create columns for each parameter by using the plus sign "+" icon.
- Values—Enter parameter values under each column/parameter heading.
- Delete Column—Delete columns by selecting the values in a column and using the "X" icon.
- Disabled—Disable specific parameters by using the check box. This is useful for debugging. The default is no.
NOTE: Context commands Enable All and Disable All are available in the Parameters pane. Once entered, parameters can be sorted by clicking the column heading.
The Parameters attribute and the Parameter File and File loop pattern attributes are mutually exclusive. Use one of these three attributes to define the loop.
See Parameters in Production for more information.
See also:


