Setting the Home Project
To set a home project for a DiveLine server:
-
With the DiveLine connection open, create a project dedicated as the DiveLine home project. See Creating a New Project.
-
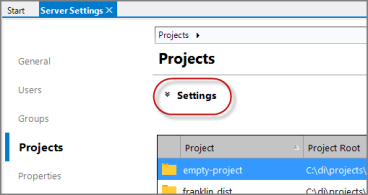
Click Tools > Server Settings > Projects, and expand the Settings
 chevron at the top.
 -
Select the Assign Home Project check box to enable the home project feature. Then, from the
 home-project list, select the project that you created in step one for the home project.
NOTE: A warning icon might appear next to the selected home project with an informational message. This operation allows all users access to the home project with read access to the top-level directory. This sets the Allow Access for all Users check box for the home project.
-
Save the tab.
The home project is set for this DiveLine server.
NOTE: When you open the home project, it has a different Workbench Explorer
 icon to identify it as the home project. This same icon appears in the Open Project dialog box, and a similar distinguishing icon appears in the project listing (Server Settings > Projects).
Next, you need to set the home directory format and access pattern in the Users tab. See Setting the Home Directory Settings.
You can enable the home project feature without using the GUI by setting the atlcfg.cfg string variable home_project and optionally the boolean variable new_user_homedir_world_readable, which defaults to FALSE. For example:
dicfg -dataroot C:\DI\Solution\dl-dataroot set string -name home_project -value "Finance Home"
dicfg -dataroot C:\DI\Solution\dl-dataroot set boolean -name new_user_homedir_world_readable -value TRUE
See Set Commands for the dicfg utility.

