OIDC Provider Setup
This topic describes how to set up and pair two common identity providers with the OIDC configuration in Workbench. Each process switches between the identity provider and the Workbench interface at times, and requires a previously configured account with the identity provider.
-
Sign into the Azure Portal.
-
Click Microsoft Entra ID in the Azure services list.
-
On the sidebar, under Manage, click App registrations.

-
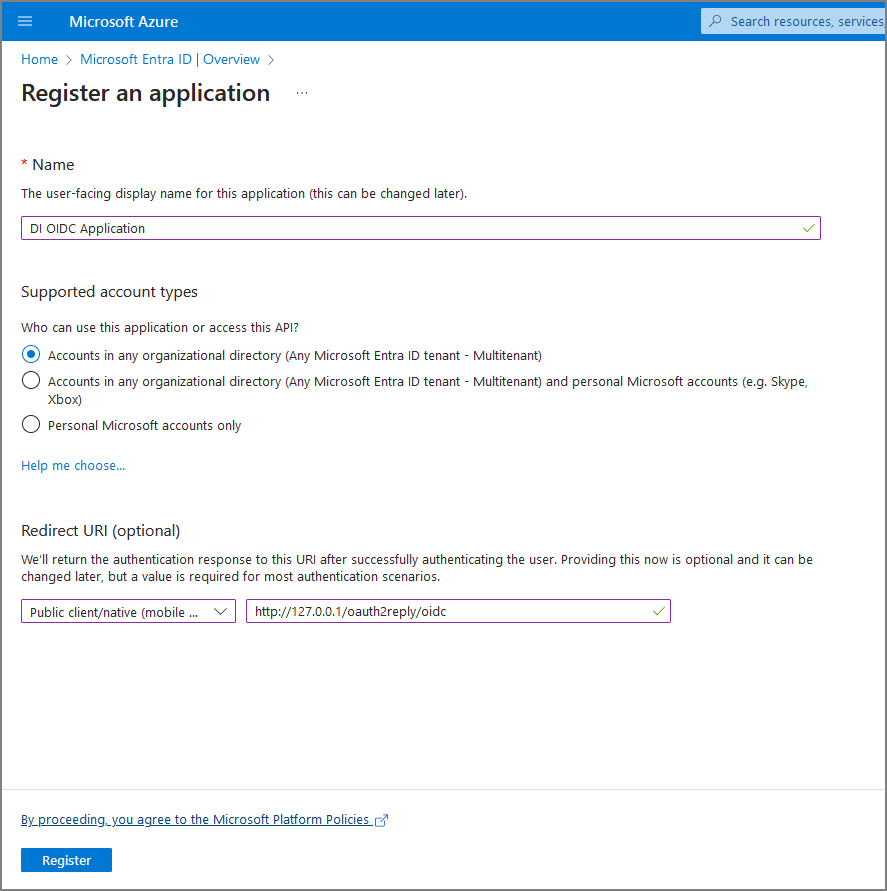
Click + New Registration and define the new app:
-
Enter a name in the Name box.
-
On the Supported account types list, select the account type.
-
Enter the following values in the Redirect URI section:
-
Type—Public client/native (mobile & desktop)
-
URL—http://127.0.0.1/oauth2reply/oidc
-
-
Click Register.
The new app registration is created and you are redirected to the home page of the app registration.

-
-
On the sidebar, under Manage, click Authentication.
The Platform Configurations page opens.
-
Click + Add a Platform.
The Configure Platforms window opens.

-
Click Single-page application.
The Configure single-page application window opens.
-
Enter a redirect URI following this pattern: https://HOSTNAME/DIVEPORTNAME/ . For example, https://diver.example.com/diveport/. The trailing slash is required.

-
Click Configure.
NOTE: If you have additional web applications, click Add URI in the Single-page Application section and follow the same URI pattern for each additional web application.
-
In the Mobile and desktop applications section, click Add URI three times.
-
Enter the following values in the new URI boxes:
-
http://127.0.0.1/oauth2reply/oidc
-
com.dimins.gateway://oauth2reply/oidc
-
com.dimins.dimobile://oauth2reply/oidc

-
-
Click Save.
-
On the main Directory page, under the Manage section of the side bar, click Enterprise Applications.
The All applications page opens.
-
Select your new application from the list of applications.
The Overview page opens.
-
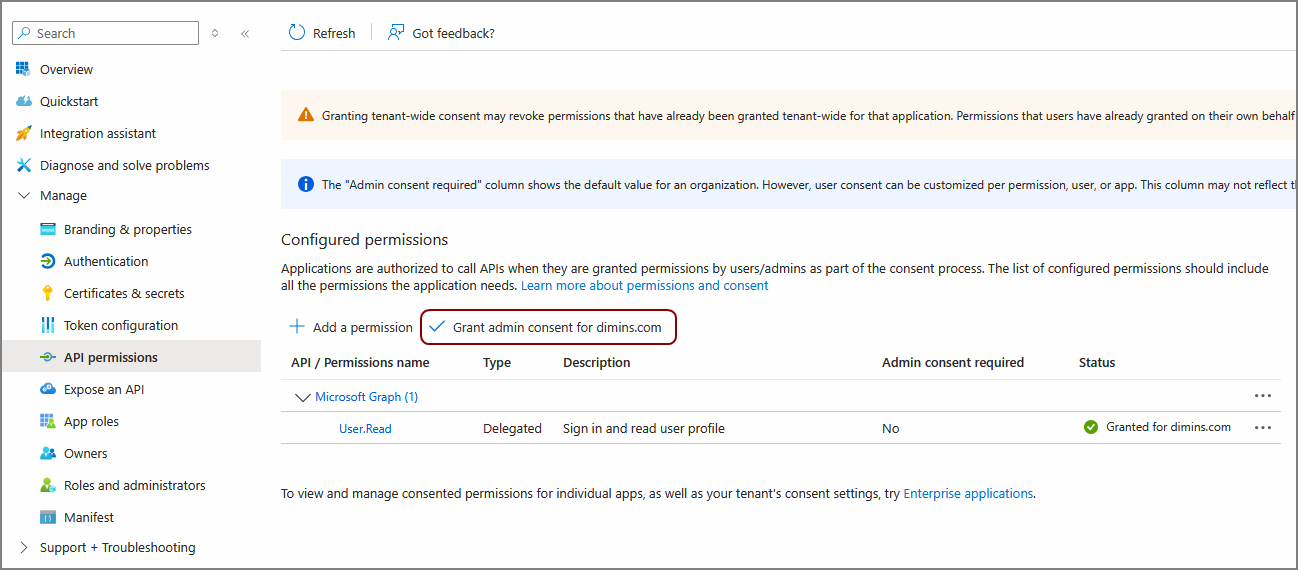
On the sidebar, under Security,click Permissions.
-
Click Grant admin consent.

Your Microsoft Entra ID identity provider is now set up. The following steps cover how to add your application information to DiveLine. It is recommended to open a Notes app to store values that you will copy from Microsoft Entra ID to Workbench.
-
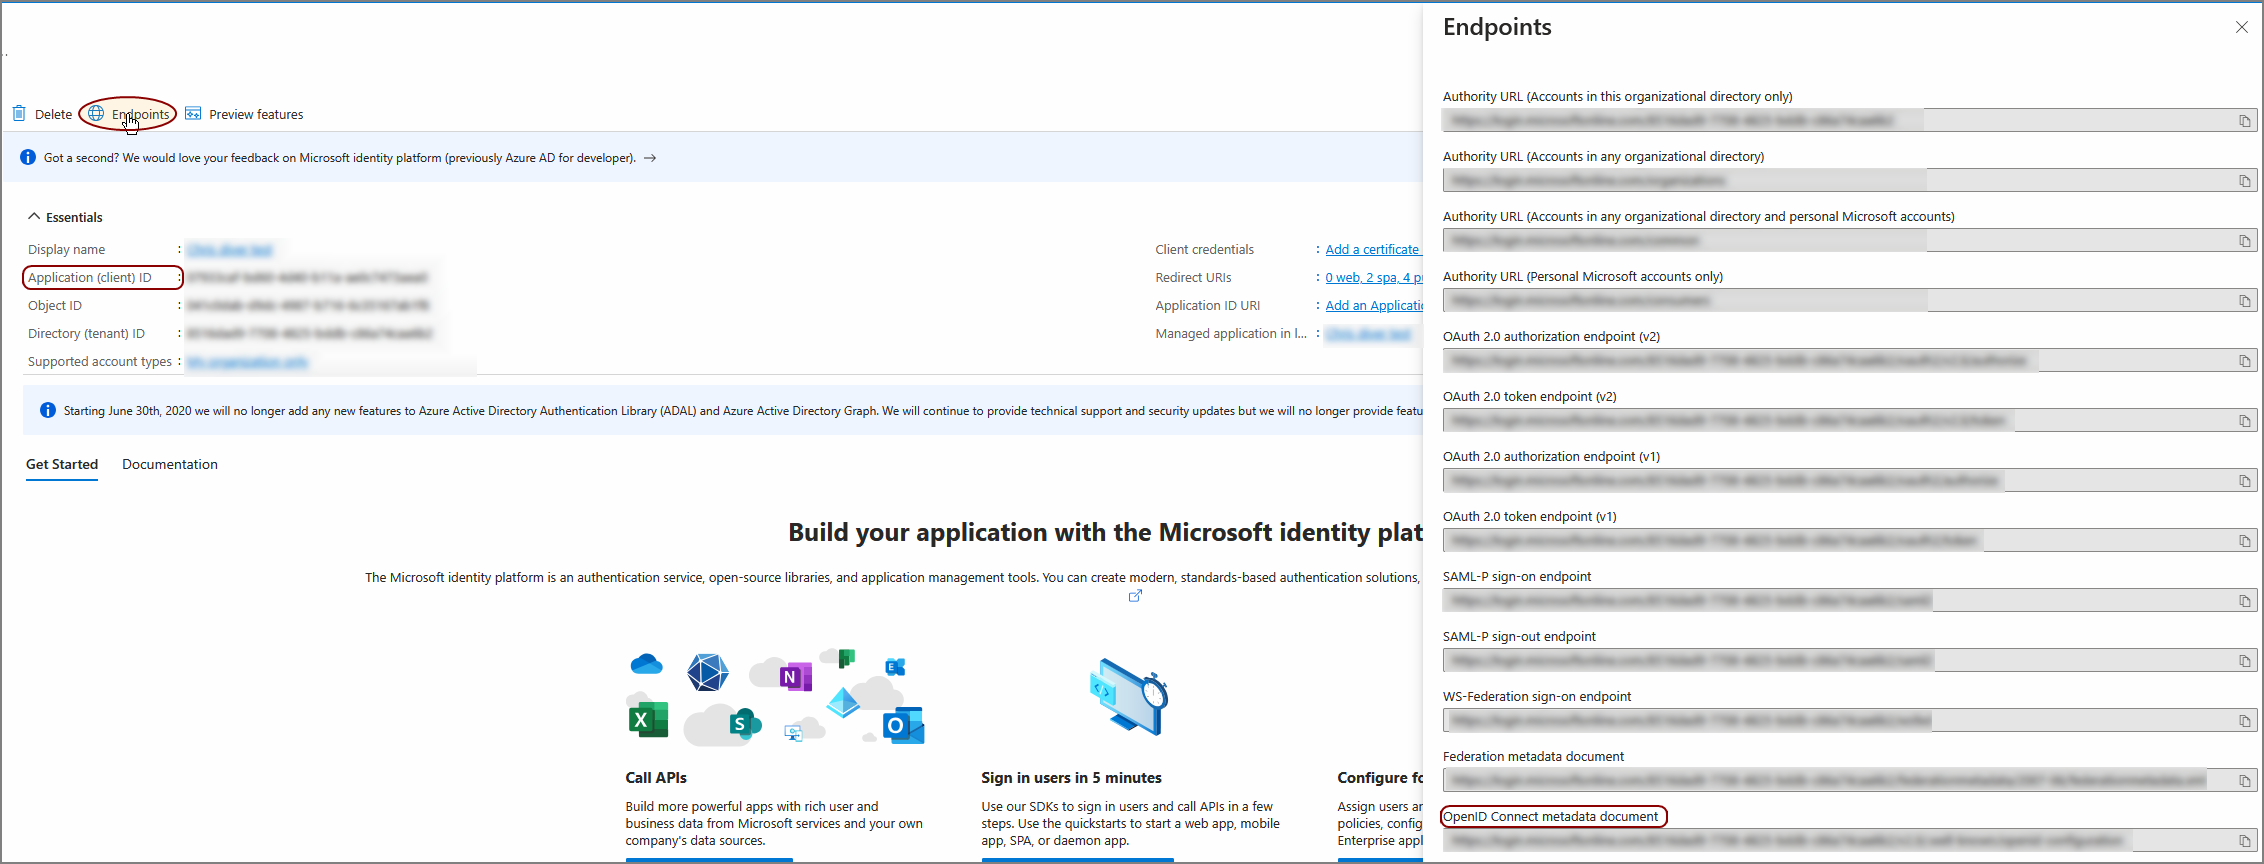
On the sidebar, click Overview.
-
Click the copy icon to the right of the Application (client) ID string.
The client ID is saved to your clipboard.
-
Either paste this value in DiveLine (step 28) or paste it in your Notes app.
-
Click Endpoints.
The Endpoints screen opens.

-
Copy the portion of the OpenID Connect metadata document URL from https through /v2.0. For example, https://login.microsoftonline.com/[Directory ID]/v2.0.
-
Either paste this value in DiveLine (step 29) or paste it in your Notes app.
-
In Workbench, open a connection with the DiveLine in which you are configuring OIDC.
-
Click Tools > Server Settings.
-
Expand the OpenID Connect Settings chevron.
-
Click Edit OIDC Identity Providers.
The Edit OIDC Providers window opens.
-
Click the plus icon
 .
. A new Identity Provider row is created.
-
Paste Application (client) ID in the Client ID column in the new row.
-
Paste the portion of the OpenID Connect metadata document URL in the Issuer column in the new row.

-
Click OK.
-
Go to Google Cloud.
-
Click Select a project in the upper left banner.
If no project exists, click New Project to create a project.

-
On the sidebar, under APIs & Services,click Credentials.
The Credentials page opens.

-
Click Create Credentials.
-
Click OAuth client id.
-
On the Application type list, select Web application.
-
On the Authorized redirect URIs section, click + Add URI for each of the following values that you want to redirect to:
-
http://127.0.0.1/oauth2reply/oidc
-
com.dimins.dimobile://oauth2reply/oidc
-
com.dimins.gateway://oauth2reply/oidc
-
com.dimins.programadvisor://oauth2reply/oidc if using Program Advisor
NOTE: For all other web applications, follow the pattern of https://[Host Name]/[DivePort Name]/. For example: https://diver.example.com/diveport/. The trailing slash is required.
-
-
Click Create.
Your web application is created.
-
Click the name of your web application on the OAuth 2.0 Client IDs list.
Your application window opens, with client information on the right side. Keep this window open, or copy the information on this window to a Notes application, as you will use this information to configure Workbench OIDC.

-
In Workbench, open a connection with the DiveLine in which you are configuring OIDC.
-
Click Tools > Server Settings.
-
Expand the OpenID Connect Settings chevron.
-
Click Edit OIDC Identity Providers.
The Edit OIDC Providers window opens.
-
Click the plus icon
 .
. A new Identity Provider row is created.
-
In the Issuer field, enter https://accounts.GOOGLE.com.
-
On the Google Cloud application window that you opened in step 9, copy the Client ID and paste the value in the Client ID box.
-
On the Edit OIDC Providers window, click Advanced.
The OIDC Advanced Options window opens.
-
On the Google Cloud application window that you opened in step 9, copy the Client Secret and paste the value in the Client secret box.

Mentioned in: