Workbench 7.0 supports Git version control within a project on a single server. It creates backups with checkpoints that can aid in recovery tasks. Starting with Workbench 7.1(14), there is more support for Git, namely DTAP-style version control where code is easily shared between multiple servers and multiple developers. Versioned code is pushed to and pulled from a central repository.
A standard work flow when using Git for version control is to perform day-to-day development work on the DEV server, perform user acceptance testing on the UAT server, and publish the final release of the software on the PROD server. This topic outlines that workflow with sample steps to get you started.
Resources mentioned here are found in this zip file: GitFiles.zip
-
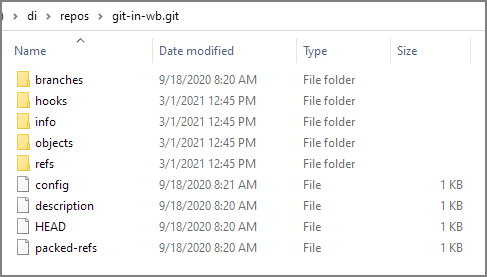
git-in-wb.git—A folder with a sample of the structure created by the Git initialization command
-
.gitkeep—A placeholder file to include empty directories
-
Webdata.gitignore—DI recommendation for DivePort files to ignore for version control
-
WorkbenchProject.gitignore—DI recommendation for files to ignore for version control purposes; be sure to adjust if your folder structures are different
When you use Git you should set your user name and email address for version control. This is important because every Git commit uses this information for the commits captured in the version control history. You can configure the default Git Author in the Workbench preferences with: Tools > Preferences > Version Control > Git Author. Enter your Email address and Full name. For example:

Each developer needs to do this for their copy of the Workbench client on their laptop so that their updates are properly identified within the repository.
Version control for DTAP-style software development is all about saving incremental code changes at logical points in time. For example, after writing and testing a new function X, you commit your changes with a comment such as "New function X written and tested." Automatic commits, perhaps done on a schedule or file close, might not necessarily happen at logical points in code development, unnecessarily complicating the code history. To turn off auto commits:
-
Open the project in Workbench.
-
Select Tools > Project Settings > Version Control.
-
On the Version Control tab, make sure all boxes are cleared.
-
Save the Project Settings.
Typically a central repository is located on a different server, separate from the development, testing, or production servers. DI recommends a GitLab server. You can find more information at https://about.gitlab.com/get-started/. A central repository can be created by either initializing an empty repository or by using the git-in-wb.git folder structure found in the GitFiles.zip file referenced at the beginning of this topic.
To initialize an empty repository:
-
Determine a folder location for the central repository. For example, if the folder is on a DiveLine server, C:\di\repos\.
-
Open the
 Command Line tool.
NOTE: The Git console used for this procedure is not the same Git console as in Workbench. The git init command does not work in the Workbench Git console.
-
Enter the following command:
git init --bare D:\DI\repos\<Git project name>.git
Replace the <Git project name> variable with the project name. -
Press Enter to create the empty Git repository.
To use the git-in-wb.git folder structure:
-
Determine a folder location for the central repository. For example, if the folder is on a DiveLine server, C:\di\repos\
-
Extract all files from GitFile.zip, and copy the git-in-wb.git folder to the folder location determined in the previous step. For example:

After the central repository is created, you can set it as the remote directory for an existing Workbench project or create a new Workbench project that clones the central repository structure.
