Installing DivePort
DivePort is a client component that resides on a web application server, typically Apache Tomcat. DivePort uses portlet web technology (both page and portlet instances) to create and customize presentations and dashboards using data compiled from multiple sources, including ProDiver markers and Spectre Dive files. You access DivePort using an Internet web browser.
NOTE: You need to be an administrative user to install the software.
To install DivePort:
- Navigate to the DI\Solution\downloads directory.
-
Double-click the DivePort-Setup.exe file.
The User Account Control dialog box opens, asking you to confirm making changes to your device.
NOTE: Depending on your Windows version and user account settings, you might see the Open File - Security Warning dialog box instead. Confirm that you want to open and run the executable.
-
Click Yes.
The
 DivePort 7.1 Setup Wizard dialog box takes a moment to open.
 -
Click Next to continue.
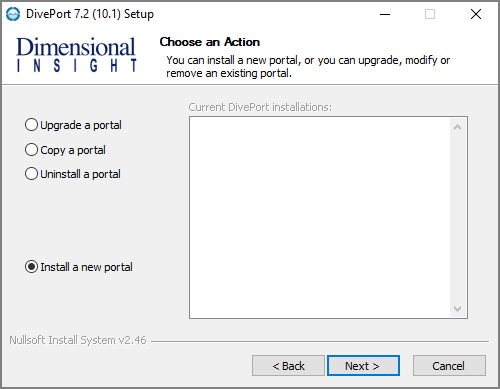
The
Choose an Action page opens. -
Click Install a New Portal, then click Next to continue.
The
Installing a New Portal page opens. - Verify the default locations for the
-
Click Next to continue.
The
Required Software page opens. This dialog prompts you to install Java (version
-
Select the check boxes for the software you must install or update.
TIP: If a path appears in the Existing Installation box, the software is already installed.
-
Click Next.
The
Install Java page opens. -
Perform the following actions:
- Accept or change the Java installation directory.
- Click License Agreement to open the terms of the license.
- Select the license agreement check box to accept the license terms.
- Click Install Java
After the installation finishes, the wizard displays the message Successfully installed Java in the Installation Result box.
-
The
Install Tomcat page opens. If you already installed Tomcat, skip to Step 12. If you have Tomcat 7 installed, you are prompted to automatically switch use from Tomcat 7 to Tomcat 9. This switches your existing and future DI web applications to Tomcat 9 and leaves Tomcat 7 files available for viewing. If you decided to not switch automatically, Tomcat 9 is still installed and you must manually resolve any conflicts between Tomcat 7 and Tomcat 9.
CAUTION: Tomcat 9 does not work with version 6.4 installers.
-
Perform the following actions:
- Accept or change the Tomcat installation directory
- Click License Agreement to open the terms of the license
- Select the license agreement check box to accept the license terms
- Click Install Tomcat
After the installation finishes, the wizard displays the message Successfully installed Tomcat in the Installation Result box.
-
The
Create Certificate for HTTPS page opens.
Because DivePort resides outside of the company firewall, it requires an HTTPS certificate to communicate with the Tomcat protocol which resides inside the firewall.
This step enables you to create a self-signed certificate. You can create a self-signed certificate to get your DivePort working as soon as possible. You can later create a Certificate Service Request that you can forward to a certification authority, such as GoDaddy. You can then work with this vendor to install a fully validated HTTPS certificate. The vendor (certificate authority) from whom you purchase the certificate should provide you with or point you to directions for installing the certificate.
NOTE: If you want to skip this step and subsequently create a Certificate Service Request (CSR) document using the wizard, select Skip this step and proceed to Step 14.
To complete the self-signed certificate, enter the following information:
- File Out—The path to the directory where you want to store the certificate. The default path is
C:\Users\<user name>\Documents\keystore. - Name—The server name that the DivePort connects to. If you are performing a local installation, enter the name of that machine. Otherwise, this value is typically the domain name of your site. For example, a local installation is jsmith-001, while a domain name is <server>.<company>.com.
- Organizational Unit—A name that describes your type of business. For example, BI Software.
- Organization—The name of your company. For example, Dimensional Insight.
- City/Locality, State/Province, and 2-Letter Country Code—The location where your company is licensed to do business with local or state government.
- Password—The certificate password, which defaults to tomcat. Be sure to remember the password, if you create a CSR.
- File Out—The path to the directory where you want to store the certificate. The default path is
-
Click Create Certificate to generate the certificate and display the message Successfully created Certificate in the Creation Result box.
NOTE: A self-signed certificate generates browser warnings requiring you to verify the authenticity of the certificate.
-
The
Certificate Signing Request for HTTPS page opens.The wizard populates the dialog box with information needed by a Certificate Authority to authorize the signed certificate (for example, keystore location and tomcat_cert_request.csr location).
If you generated a self-signed certificate in the previous step, you can select Skip this step to continue with the installation of the self-signed certificate. Proceed to Step 16.
- Optionally, click Create Request to create a certificate request. Upon completion, the wizard displays the message Successfully created Request in the Request Result box.
-
The
Install Certificate for HTTPS page opens. -
Click Install Certificate to install the self-signed certificate created in Step 12.
Upon completion, the wizard displays the Successfully installed certificate message in the Installation Result box.
The following events happen when you install the self-signed certificate:
- The wizard copies the certificate keystore from C:\Users\<User>\Documents (when generated) to C:\DI\Tomcat\Tomcat 9.0\conf (when installed).
-
The wizard updates the server.xml file located in the conf directory with the following line of XML code:
<Connector port="443" protocol="org.apache.coyote.http11.Http11Protocol" SSLEnabled="true" maxThreads="150" scheme="https" secure="true" clientAuth="false" sslProtocol="TLS" keystoreFile="C:\
The HTTPS-enabled self-signed certificate enables your DivePort to communicate with the server over the Transport Layer Security (TLS) communication.
TLS is a security protocol for establishing an encrypted link between a server and a client, typically a Web Server and a browser, or a mail client and another mail client.
-
The
Installing a New Portal page opens, with the following field defaults:- Portal name—The default name is diveport. You can change it to suit your needs.
- Path to DI Solution folder—The default folder is C:\DI\Solution.
- Path to Java—The default path is C:\DI\Java\jdk-11.0.1.
- Path to Tomcat—The default path is C:\DI\Tomcat\Tomcat 9.0.
A best practice is to change the default Portal name to something other than diveport (for example, diveport-test) to keep the software distinct from the project or application implementation. One installation of the software can support multiple instances or portals. Verify the other default fields.
-
Click Next.
The second
Installing a New Portal page opens, with the default name of the DiveLine service and port number (for example, jsmith-001:2131). Verify that the port number matches the DiveLine service. This dialog also prompts you to enter the administrator Username and Password previously defined for the DiveLine administrator.CAUTION: Version 7.1 can only connect to a 7.0 or 7.1 DiveLine.
-
Click Next.
The
Ready to Install page opens, with a summary of the DivePort installation information.NOTE: Take note of the Portal URL. This is used to access DivePort from a web browsesr.
- Click Install.
-
When you see the
Completing the DivePort 7.1 Setup Wizard dialog box, click Finish. - Restart your machine.