Installing Apache Tomcat
This page describes how to install Apache Tomcat using the apt-get utility. Apt-get is a free package management command line program. Apt-get works with Ubuntu’s APT (Advanced Packaging Tool) library to perform the installation, deletion, or upgrading of new or existing software packages.
IMPORTANT: Individual steps required to install the software can vary at your site. depending on the distribution and version you are using.
NOTE: DI recommends Tomcat 9.0.
To install Apache Tomcat:
-
Navigate to the /di/platform/downloads directory.
cd /di/platform/downloads
-
Decompress the apache-tomcat-<version number>.tar.gz file.
sudo tar -xvzf apache-tomcat-<version number>.tar.gz
The -xvzf arguments do the following:
- x—Extracts the files from the archive
- v—Lists all files as they are processed
- z—Uncompresses the files
- f—Names the file you are uncompressing
The file unpacks and creates the apache-tomcat-<version number> subdirectory.
-
Go to the Apache Tomcat folder.
cd apache-tomcat-<version number>
-
Update your apt-get package lists by entering the following command:
sudo apt-get update

NOTE: The apt-get utility works on a database of available packages. This command updates the database with any newer packages.
-
Start the Tomcat installation by entering a command similar to the following:
sudo apt-get install tomcat<version number>

NOTE: Apt-get installs Tomcat to the /etc/tomcat<version number> directory.
-
Navigate to the /etc/default directory .
cd /etc/default
-
View the permissions for the tomcat<version number> configuration file by entering a command similar to the following:
ls -l tomcat<version number>
The permissions display. If the permissions are -rwxrwxwx, you can run the utility. Proceed to step 9.
If you do not have permission to run the utility:
-
Enable the execute permission.
sudo chmod a+rwx tomcat<version number>
-
Verify that the permissions have changed.
ls -l tomcat<version number>
The permissions display as -rwxrwxrwx.
NOTE: If you are using SELinux on Red Hat 7.x, ensure that the webdata and webapps folders have the appropriate filesystem labels for Tomcat to be able to access them (for example, tomcat_var_lib_t). For more information, see Red Hat documentation.
-
-
Open the tomcat<version number> configuration file with a text editor, such as gedit, by entering a command similar to the following:
gedit tomcat<version number>
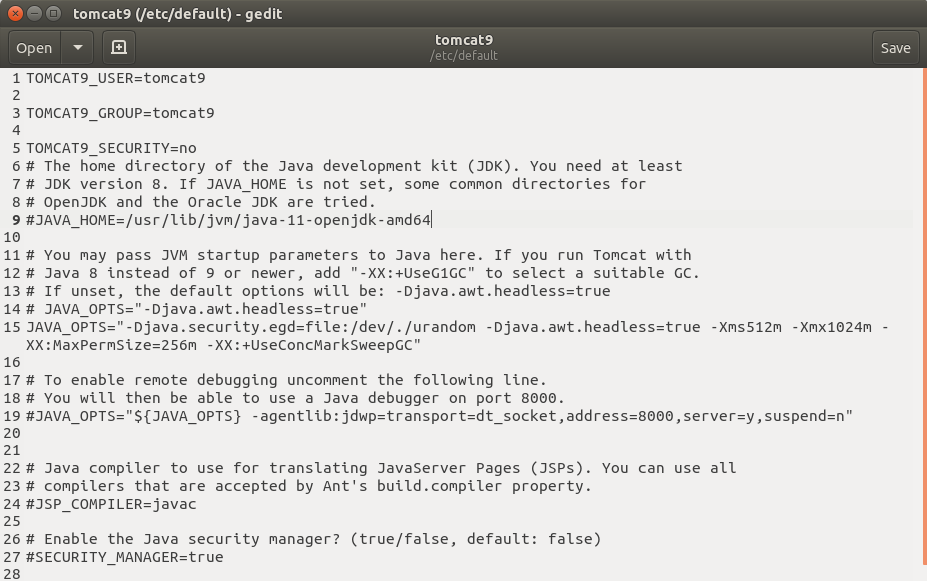
Here is an example of the configuration file:

TOMCAT9_USER=tomcat9 indicates the Tomcat user name on the machine.
-
Locate the JAVA_OPTS parameter (last line in the above figure) and replace it with the following:
JAVA_OPTS="-Djava.security.egd=file:/dev/./urandom -Djava.awt.headless=true -Xms512m -Xmx1024m -XX:MaxPermSize=256m -XX:+UseConcMarkSweepGC"
-
Change the TOMCAT9_SECURITY variable value to no, and remove the comment tag, #, at the beginning of the line.
- Save and close the changed configuration file.
-
Change the ownership of webdata and operate on its files and sub-directories to enable Tomcat to write files to the DI webdata directory.
sudo chown -R tomcat<version number> /di/platform/webdata
For example:

-
To start, restart, and stop the Tomcat server, navigate to the apache-tomcat-<version number>/bin directory with the following command:
cd /di/platform/downloads/apache-tomcat-<version-number>/bin
-
Start Tomcat by entering the following command:
sudo ./startup.sh
-
Stop Tomcat by entering the following command:
sudo ./shutdown.sh

-
-
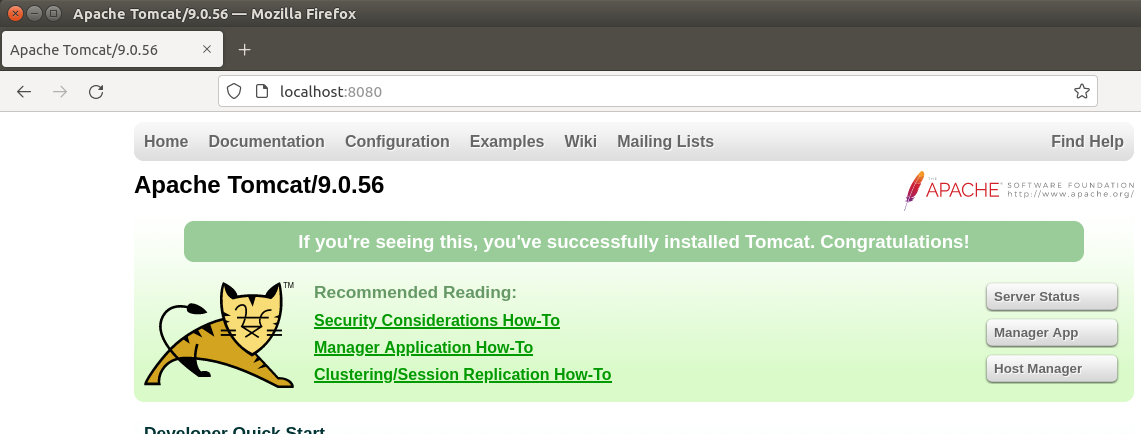
With Tomcat running, open a web browser and enter the URL to test the Tomcat installation. Use the following format:
http://<server name>:8080
For example, http://localhost:8080
Press Enter to display a page similar to the following:

NOTE: It is possible to install Tomcat using a system account that is not an administrator, but this prevents full access to the machine. Be sure the user that Tomcat runs as has file system access to Tomcat's installation folder and subfolders, plus the DI webapps and webdata folders.