Adding a NetDiver Click Action to a Portlet
To add a NetDiver click action to a portlet:
-
Open the Edit <Portlet type> Portlet dialog box.
 Remind me how.
- Browse to the page that contains the portlet that you want to edit.
-
On the DivePort toolbar, click Edit to unlock the page and enable edit mode.
- Right-click the portlet that you want to edit, and then on the context menu, click Edit.
-
Click Click Actions.
The Click Actions
 dialog box opens, displaying a list of existing click actions.
 -
Click Add.
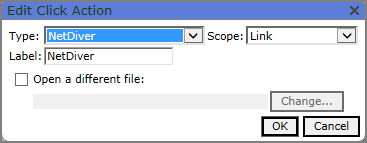
The Edit Click Action
 dialog box opens.
 -
From the Type list, select NetDiver.
The Edit Click Action
 dialog box changes to show options for the NetDiver click action.
 -
Select a Scope.
- Portlet and Row—Activates when you click anywhere in the portlet instance.
- Link—Activates when you click a link icon or label at the bottom of the portlet instance
NOTE: Scope options depend on the portlet type.
-
If you want something other than NetDiver to display in the click action context menu, enter a name in the Label box.
-
By default, NetDiver click actions open NetDiver with the data that is showing on the portlet. If you want NetDiver to open with a different data source, select Open a different file, click Change, and then browse to the marker, model, DivePlan, or Tunnel Script that you want to use.
NOTE: This option is not available for every portlet type.
-
Click OK to close the Edit Click Action dialog box.
The new click action is added to the Click Actions dialog box.
-
If this is the only click action on the list, and you want NetDiver to open immediately when the click action is triggered, select Skip the menu when there is only one action.
-
Click OK to close the Click Actions dialog box.
-
Click OK to close the Edit Portlet dialog box.
-
On the toolbar, click Save to exit edit mode and lock the page.
Activate the resulting click action on the portlet, and verify that NetDiver opens and displays the marker.
See also:


